Imaging and Setup
The XRP uses a Raspberry Pi Pico W as its main processor. A special firmware will need to be installed so that the robot operates properly.
Download
The XRP firmware must be downloaded and written to the Pico W. Click on Assets at the bottom of the description to see the available image files:
Imaging
To image the XRP, perform the following steps:
Extract the contents of the firmware ZIP file. You should end up with a
.uf2file.Plug the XRP into your computer with a Micro-USB cable. You should see a red power LED that lights up.
While holding the
BOOTSELbutton (the white button on the green Pico W, near the USB connector), quickly press the reset button (circled below), and then release theBOOTSELbutton.

The board will temporarily disconnect from your computer, and then reconnect as a USB storage device named
RPI-RP2.Drag the
.uf2firmware file into theRPI-RP2drive, which will automatically update the firmware.Once complete, the
RPI-RP2USB storage device will disconnect. You can disconnect the XRP board from your computer and run it off battery power.
First Boot
Perform the following steps to get your XRP ready for use:
Ensure that you have 4 AA batteries installed
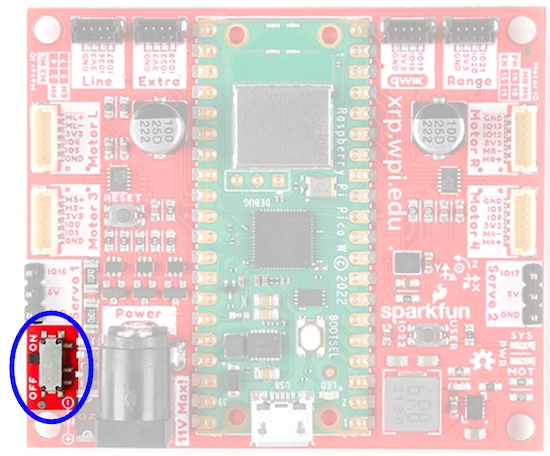
Turn the XRP on by sliding the power switch (circled below) on the XRP board to the on position. A red power LED will turn on.

Using your computer, connect to the XRP WiFi network using the SSID
XRP-<IDENT>(where<IDENT>is based on the unique ID of the Pico W) with the WPA2 passphrasexrp-wpilib.

Booting up the XRP
Upon start-up (when power is applied to the XRP either via battery or USB), the following will happen:
The IMU will calibrate itself. This lasts approximately 3-5 seconds and will be indicated by the green LED blinking rapidly. Ideally, the XRP should be placed on a flat surface before powering up, and if necessary, users can hit the reset button to restart the firmware and IMU calibration process.
The network will be configured, depending on the configuration settings. See the section on the Web UI for more information on how to configure the network settings. By default, the XRP will broadcast its own WiFi Access Point.
After this, the XRP is ready for use.
The XRP Web GUI
The XRP provides a simple Web UI for configuration. It is accessible at http://<IP Address of XRP>:5000. By default, this is http://192.168.42.1:5000.
The XRP configuration is a simple JSON object that allows a user to configure the network settings of the XRP.

Switching Network Modes
Box 3 in the image above shows the field that needs to be changed in order to switch the XRP from Access Point mode to/from Station mode. In Access Point (AP) mode, the XRP will broadcast a WiFi network. In Station (STA) mode, the XRP will connect to an existing WiFi network. Update the mode field with the appropriate value (AP/STA).
Setting up a default Access Point (AP)
By default, the XRP will operate in Access Point mode, where it broadcasts a WiFi network. Box 1 in the image above shows which fields control the settings for the AP SSID and passphrase.
If the operating mode is set toAP, the access point information will be used to create the WiFi Access Point. If the mode is set to STA (station) and the XRP is unable to connect to any of the listed WiFi networks, then it will fall back to AP mode, again, using the information specified in box 1.
Connecting to an existing WiFi network
Box 2 in the image above shows an example of listing a WiFi network that you want the XRP to connect to. the networkList array can be populated with as many preferred networks as you would like (following the same format as Box 2). When set to STA mode, the XRP will attempt to connect to each listed network in order. If none of the networks are available, the XRP will fall back into AP mode.
Note
If you are unsure about what mode the XRP is operating in, or which WiFi network it is connected to, you can connect the XRP to a computer via a USB cable. A USB storage device named PICODISK will appear, and the xrp-status.txt file within it will list the appropriate network information.

now http://192.168.68.125:5000/

Last updated